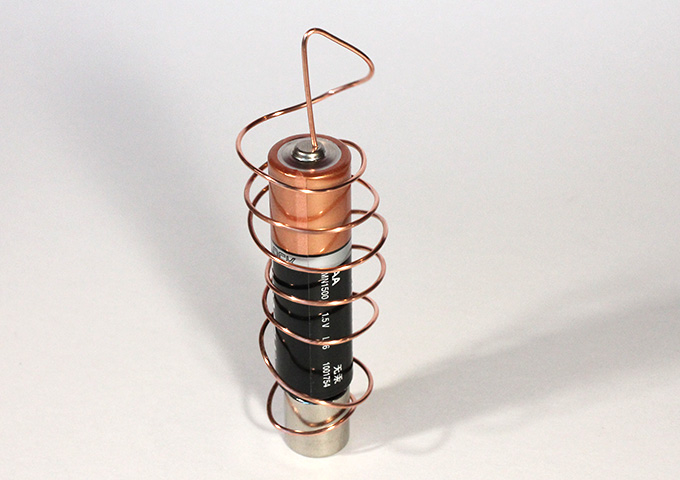
What you need
- 50 cm uncoated copper wire (e.g. picture-hanging wire)
- AA battery
- neodymium magnet, cylindrical in shape with a diameter similar to that of the battery (available from hardware stores)
Safety warning
Keep neodymium magnets out of reach of children and away from people with pacemakers. Strong magnets may snap onto metal objects with great force and can pinch skin or shatter on impact.
The battery and wire may become hot due to an electrical current passing through the low-resistance copper wire. Take apart the motor when not in use to avoid over-heating.
What to do
- Bend the copper wire around the battery to make a coil, leaving about 5 cm of straight wire at the top.
- Open out the coil so it is a little larger than the battery.
- Bend over the straight section of wire so the coil can balance on the positive (+) terminal of the battery.
- Sit the battery on the magnet and shape the bottom of the coil around the magnet so the wire only just touches the magnet in at least two places. Don’t make it too tight or the motor (wire) won’t spin.
- Adjust the shape of the wire so it balances and spins freely on the battery. The top of the wire must stay in contact with the positive terminal of the battery and the bottom of the wire must touch the magnet. It can take some time and patience to make it work, but it will all be worth it when it starts to spin!
What’s happening?
The copper wire carries an electrical current between the positive (+) and negative (-) terminals of the battery. The current-carrying wire is surrounded by a magnetic field and this magnetic field interacts with the magnetic field that surrounds the neodymium magnet. A force is created, perpendicular to the direction of the current. This is called a ‘Lorentz force’ and it causes the spinning motion of the motor.
This is a ‘homopolar motor’ because the magnet is in a fixed position.


